How to Glue Plywood to Joists: Step-by-Step DIY Guide
Blog post description.Whether you're renovating a room or building a home from the ground up, knowing how to glue plywood properly is a skill every DIY enthusiast or contractor in the USA and Canada should have.
ADHESIVES

How to Glue Plywood to Joists: Step-by-Step DIY Guide
Gluing plywood to joists is a crucial part of building a stable, squeak-free subfloor. Whether you're renovating a room or building a home from the ground up, knowing how to glue plywood properly is a skill every DIY enthusiast or contractor in the USA and Canada should have. Using the right adhesive and method ensures your floors remain strong, quiet, and long-lasting.
Why Gluing Plywood to Joists Matters
Traditionally, floors were nailed or screwed to joists, but over time, this can lead to movement and annoying squeaks. Gluing the plywood in addition to fastening it mechanically helps create a tight bond, reducing flex and noise. Construction adhesives form a continuous layer between the joist and the plywood, minimizing gaps and reinforcing structural integrity.
In cold climates like Canada or areas with shifting temperatures across the USA, the right subfloor glue plays an essential role in maintaining floor performance over time. Using high-quality, low VOC or polyurethane-based adhesives can provide long-term durability while meeting building code standards.
Tools and Materials You’ll Need
Before starting your project, make sure you have the following:
Construction adhesive (like Loctite PL Premium, Liquid Nails, or Titebond GREENchoice)
Caulk gun or subfloor adhesive gun
Glue roller (optional for spreading)
Measuring tape
Chalk line
Power drill and wood screws
Safety gear (gloves, goggles, mask)
Plywood sheets (usually 3/4” for subflooring)
Choose a strong adhesive that is rated for subfloor applications and performs well in cold or damp environments—especially if you’re working in areas like Toronto, Montreal, or the northern US states.
Step 1: Prepare the Joists and Plywood
Clean the joists by removing dust, debris, or old glue using a broom or vacuum. Joists should be dry and structurally sound. If any joist is warped or cracked, replace or repair it before gluing plywood.
Measure your room and cut plywood sheets accordingly. Ensure each piece has room to expand slightly—leave a 1/8” gap between sheets.
Step 2: Mark the Joist Locations
Use a chalk line to mark joist locations on top of the plywood. This will help guide your screw placement after gluing. Accurate marking is especially useful for large installations or renovations where joists might not be immediately visible.
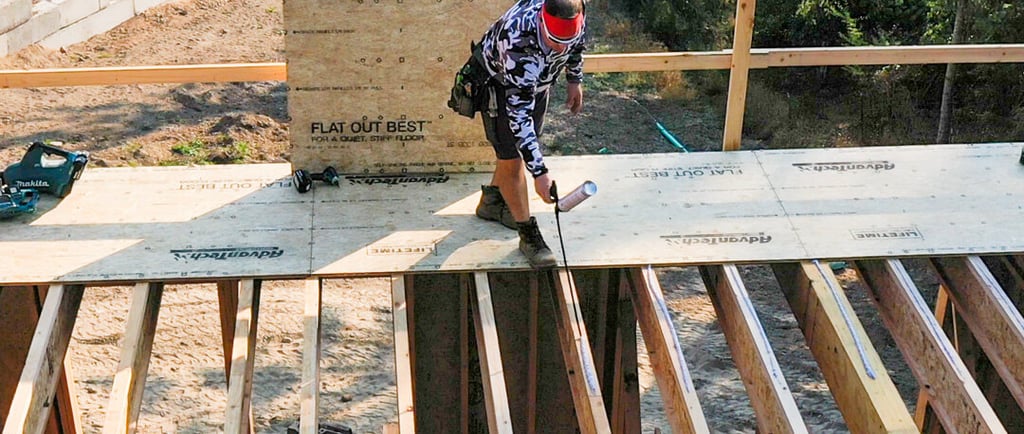
Step 3: Apply the Construction Adhesive
Using your adhesive gun, apply a generous zigzag or straight bead of construction adhesive along the top of each joist. Don’t skip any joist, as missing glue spots can lead to loose boards and floor noise later.
For large surfaces, you can use a glue roller to spread the adhesive evenly. This ensures full contact and bonding, especially when using eco-friendly or low VOC adhesives that set quickly.
Step 4: Lay Down the Plywood Panels
Carefully place your plywood sheet onto the glued joists. Press it down firmly by walking across the surface or using a weighted roller. Work quickly but carefully—some adhesives start curing in as little as 15 minutes.
Make sure the panels align properly and maintain spacing between them. Use spacers if needed to maintain consistent gaps and avoid edge contact that could lead to buckling.
Step 5: Fasten the Plywood to the Joists
Once the plywood is glued in place, secure it further with screws or ring-shank nails. Begin at the center of the panel and work outward to prevent air pockets. Drive fasteners every 6 to 8 inches along the joists, and no more than 12 inches in the field.
This dual bonding method—adhesive plus mechanical fasteners—is a best practice across the construction industry in both Canada and the USA.
Step 6: Check for Proper Adhesion
After laying and fastening each panel, check for proper adhesion by stepping on different areas. There should be no bounce or movement. If a section lifts or shifts, it may indicate insufficient adhesive or uneven joists.
Let the glue cure for at least 24 hours before subjecting it to heavy traffic or installing finished flooring like hardwood, vinyl, or carpet.
Tips for Success
Choose the Right Adhesive: For cold climates or subflooring over concrete, a polyurethane adhesive is often the strongest and most durable choice. Brands like DAP Dynagrip and Titebond GREENchoice are excellent for subfloor use.
Work in Sections: Only apply adhesive to one or two joists at a time. Most glues begin to skin over within minutes, especially fast-drying types designed for subfloor installations.
Use Screws Over Nails: Screws provide better hold and reduce the risk of floor squeaks over time. This is especially true in high-traffic areas like kitchens or hallways.
Ventilate the Area: Even low VOC adhesives can have an odor. Ensure the room is well-ventilated, especially when working indoors during winter in colder regions.
Avoid Rain or Humidity: Moisture can affect glue performance and plywood stability. Plan your installation when weather conditions are dry.
Common Mistakes to Avoid
Skipping glue on one or more joists.
Applying too little adhesive.
Letting the glue dry before placing the plywood.
Using the wrong type of adhesive not rated for subfloors.
Forgetting expansion gaps between panels.
Avoid these pitfalls to ensure a floor that lasts for decades without issues.
Glue Options Recommended for USA and Canada
If you’re unsure what glue to choose, here are some of the best options for gluing plywood to joists:
Loctite PL Premium: High strength, works in wet or frozen conditions, great for outdoor and indoor applications.
Titebond GREENchoice Heavy Duty: Low VOC and ideal for green building.
DAP Dynagrip Subfloor Adhesive: Designed for strong initial grab and long-term durability.
Liquid Nails Subfloor & Deck: Easy to apply with a caulk gun and bonds to most surfaces.
These brands are commonly available in stores like Home Depot, Lowe’s, and RONA, and are widely used across North America.
Conclusion
Learning how to glue plywood to joists is a DIY skill that offers long-term benefits for your home’s flooring system. By following a step-by-step approach and using the right adhesive and tools, you can create a stable, quiet, and strong subfloor that supports any type of finished flooring.
Whether you're in a modern urban condo in Vancouver or building a cabin in the woods of Maine, gluing plywood properly to joists helps ensure your structure remains durable for years to come.
If you're serious about long-term value and structural performance, always choose the best subfloor glue and installation practices trusted by professionals across the USA and Canada.